Understanding Why Old Grease Becomes Gummy
Fishing reels require regular maintenance to perform at their best. Over time, the lubricants inside your reel can break down and become sticky. This happens because exposure to water, salt, dirt, and temperature changes causes the grease to oxidize. When this occurs, your reel’s performance suffers dramatically. You might notice reduced casting distance, difficulty turning the handle, or strange noises during operation. Therefore, removing old, gummy grease is essential for restoring your reel’s smooth functionality. Many anglers turn to resources like Crazy Fishing Gear for expert advice on tackle maintenance and performance optimization.
Why Proper Lubrication Matters
The condition of your reel’s internal components directly affects your fishing success. Old, degraded grease creates friction between moving parts, which accelerates wear and can lead to costly damage. Additionally, gummy grease attracts more dirt and debris, creating an abrasive paste that grinds away at gears and bearings. Regular cleaning and reapplication of fresh reel oil and grease ensures optimal performance and extends the lifespan of your equipment. Professional anglers understand that proper maintenance prevents problems before they start.
According to Popular Mechanics, regular maintenance of precision equipment significantly extends its operational life and prevents unexpected failures. This principle applies perfectly to fishing reels, where small investments in cleaning time yield substantial long-term benefits.
Gathering Your Cleaning Supplies
Before you begin disassembling your reel, collect the necessary materials. You will need a clean workspace with good lighting and adequate ventilation. Essential supplies include cotton swabs, microfiber cloths, small brushes (old toothbrushes work well), and cleaning solvent. For solvents, options include isopropyl alcohol, mineral spirits, or specialized reel cleaners. Additionally, you should have small containers to organize screws and parts during disassembly. A camera or smartphone helps document the process, making reassembly much easier. Finally, prepare your replacement lubricants before starting.
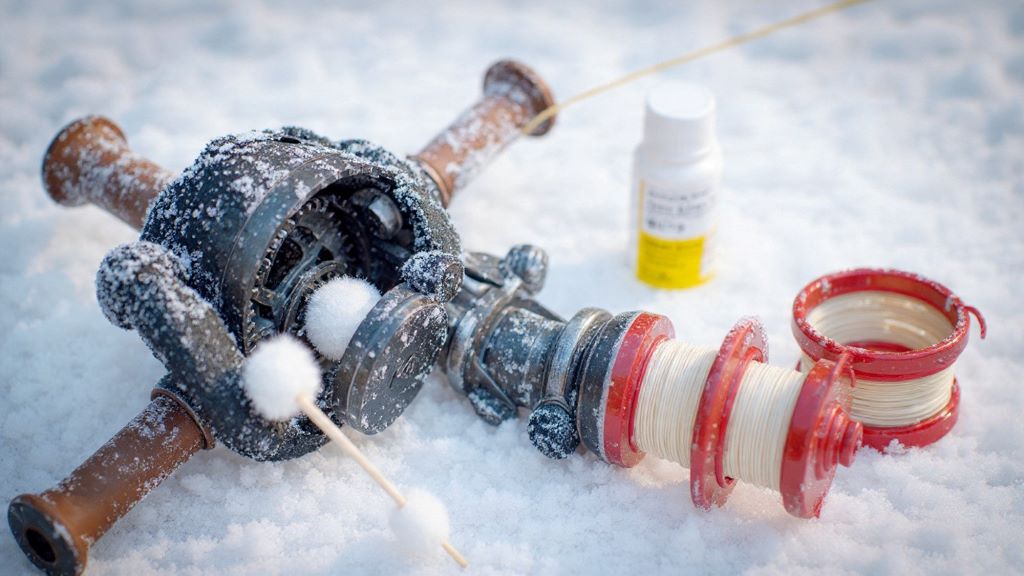
Disassembling Your Reel Safely
Start by removing the spool and setting it aside. Take photographs at each step to create a visual reference for reassembly. Next, locate and remove the side plate screws carefully. Keep all screws organized by size and location in separate containers or on a magnetic parts tray. As you remove each component, pay attention to how parts fit together and their orientation. However, if you encounter resistance, stop and reassess rather than forcing anything. Some reels have specific disassembly sequences that prevent damage.
Remove the handle, drag knob, and any external components first. Then, carefully lift away the side plate to expose the internal gears and bearings. Take note of any washers or shims and their exact positions. These small components are crucial for proper reel function.
Removing Old, Gummy Grease
Once you have access to the internal components, begin the cleaning process. Apply your chosen solvent to a cotton swab or small brush. Gently work the solvent into the old grease, allowing it to break down the sticky residue. The gummy material will gradually soften and become easier to remove. Therefore, patience is important during this stage. Avoid rushing, as thorough cleaning now prevents problems later.
For heavily contaminated areas, you may need to soak components briefly. Place small parts in a container with solvent for five to ten minutes. However, avoid soaking sealed bearings, as this can damage their internal seals. Instead, clean sealed bearings externally with careful swabbing. Use compressed air to blow away loosened debris, but maintain a safe distance to avoid forcing contaminants deeper into components.
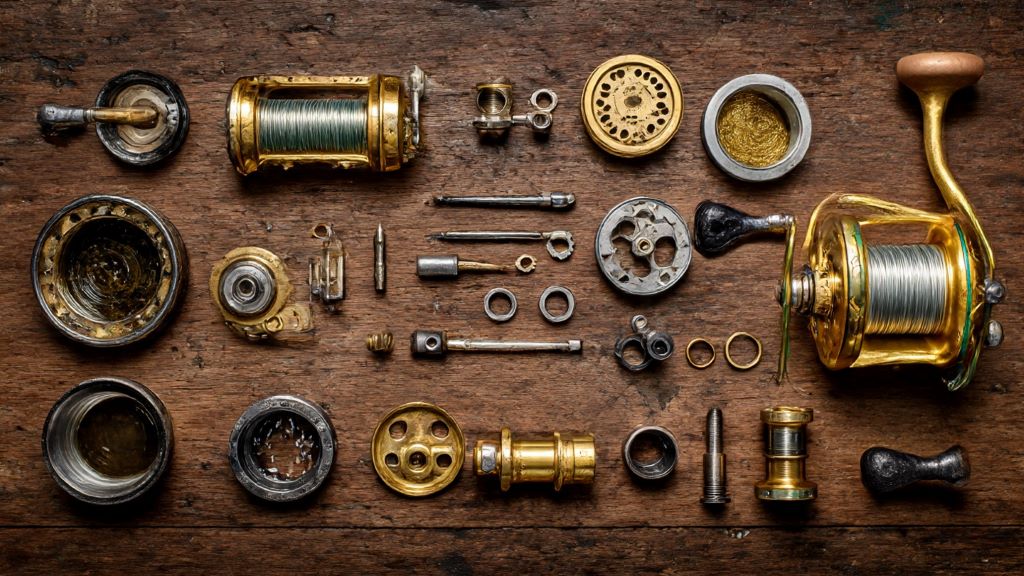
Cleaning Individual Components
After removing the bulk of old grease, clean each component individually. Wipe down gears thoroughly, ensuring all old lubricant is removed from teeth and valleys. Bearings require special attention because trapped dirt causes premature wear. For open bearings, flush them with solvent and spin them to work out embedded particles. The bearing should spin freely and quietly when clean.
Additionally, clean the reel body itself, removing old grease from mounting surfaces and bearing seats. Any remaining contamination will mix with new lubricant and reduce its effectiveness. Use fresh cotton swabs frequently rather than spreading old grease around. Microfiber cloths excel at final wiping because they capture fine particles effectively.
Inspecting for Damage
While components are clean and visible, inspect them carefully for wear or damage. Look for worn gear teeth, cracked plastic parts, or corroded metal surfaces. Bearings should spin smoothly without grinding or catching. If you discover damaged parts, now is the ideal time to order replacements. Furthermore, addressing these issues prevents future failures during important fishing trips. Small problems often become major failures when ignored.
Drying Components Thoroughly
Before applying new lubricant, ensure all components are completely dry. Residual solvent dilutes fresh grease and reduces its protective properties. Allow parts to air dry for at least thirty minutes in a clean environment. Alternatively, use compressed air to accelerate drying. Check hidden areas like gear recesses where solvent might pool. Any moisture remaining inside the reel can cause corrosion over time.
Applying Fresh Lubricants Correctly
With clean, dry components ready, begin applying appropriate lubricants. Use reel-specific grease on gears, applying thin, even coats to all tooth surfaces. Avoid over-greasing, which attracts dirt and creates drag. Bearings typically require oil rather than grease because they need to spin at high speeds. Place one drop of quality reel oil on each bearing, rotating it to distribute the lubricant evenly.
Apply grease to bushings, cam surfaces, and other sliding contact points. The key is using just enough lubricant to protect surfaces without excess buildup. Remember that too much lubricant causes more problems than too little. Therefore, start conservatively and add more only if needed after testing.
Reassembling Your Reel
Reassembly follows the reverse order of disassembly. Refer to your photographs frequently to ensure correct component placement. Replace shims and washers in their exact original positions, as these affect gear alignment and play. Tighten screws gradually and evenly, avoiding overtightening that can strip threads or crack housings. Additionally, perform a function check after each major component is reinstalled.
Once fully reassembled, test the reel thoroughly. The handle should turn smoothly without binding or rough spots. The drag should engage progressively and release cleanly. Casting and retrieval should feel noticeably improved compared to before cleaning.
Maintaining Your Reel Long-Term
Preventing grease from becoming gummy again requires regular maintenance. After each saltwater use, rinse your reel with fresh water and dry it completely. Periodically, perhaps every three to six months depending on use, perform light maintenance by adding oil to accessible bearings. However, complete disassembly and cleaning should happen annually for most anglers or more frequently for heavy users.
Store reels in a cool, dry place away from direct sunlight. Extreme temperatures accelerate lubricant degradation. Furthermore, slightly loosening the drag before storage prevents prolonged compression of drag washers.
Conclusion
Removing old, gummy grease from your fishing reel is an essential maintenance task that dramatically improves performance. By following these systematic steps, you can restore your reel to like-new condition. The process requires patience and attention to detail, but the results are worth the effort. Clean internal components, fresh lubricants, and proper reassembly ensure smooth operation and extended equipment life. Regular maintenance prevents the buildup of problematic grease and keeps your reel ready for action. Therefore, make reel cleaning a regular part of your fishing routine and enjoy improved casting, retrieval, and overall fishing success.
Frequently Asked Questions
How often should I remove and replace reel grease?
Most anglers should perform a complete reel cleaning and regreasing annually. However, if you fish frequently in saltwater or harsh conditions, consider cleaning every six months. Light maintenance between deep cleanings helps prevent serious grease degradation.
Can I use automotive grease on my fishing reel?
No, automotive grease is too thick and heavy for fishing reel applications. It creates excessive drag and attracts contaminants. Always use lubricants specifically designed for fishing reels, as they have the correct viscosity and protective properties for these precision mechanisms.
What causes reel grease to become gummy?
Grease becomes gummy through oxidation, contamination, and age. Exposure to water, salt, temperature changes, and dirt causes chemical breakdown. Additionally, some lower-quality greases degrade faster than premium formulations designed for marine environments.
Is it difficult to disassemble a fishing reel?
Difficulty varies by reel type and model. Spincast reels are generally simplest, while high-end baitcasters and spinning reels can be more complex. However, with photographs, patience, and careful organization of parts, most anglers can successfully disassemble and clean their reels. Start with less expensive reels to build confidence.
Can old grease damage my reel permanently?
Yes, if left unchecked, gummy grease can cause permanent damage. The sticky residue creates friction that wears down gears and bearings. Additionally, contaminated grease acts as an abrasive compound, grinding away metal surfaces. Therefore, addressing grease problems promptly prevents costly repairs or replacement.
Related Topics:
5 great reasons to get outdoors and get active this month